Create Your Own Linux OS In 10 Mins Without Programming
SuseStudio is a Novell-sponsored service that allows everyone, I repeat everyone, to create their own custom flavors of openSUSE and variants using nothing more than some patience and their Web browser. Sounds incredible? It is.
SUSE Studio is the next natural step of the phenomenally successful and useful Kiwi imaging system, which allows SUSE users to bake their own editions of the operating system quickly and easily.

Introduction:
Using friendly front-end appliances like Image Creator and Product Creator, Kiwi lets newbies and power users go wild with their ideas and desires, customizing the operating system like a Lego toy. The only caveat is that you have to have SUSE installed and Kiwi running on your machine.
No more. SUSE Studio lets you play with SUSE even if you don’t have it installed. You don’t even need Linux. You can work on your Windows machine, with a single tab open at SUSE Studio URL, while you check the stock market in a second tab or maybe check the latest Twitter updates in a third. It’s that simple and powerful!
After two detailed tutorials on how to use Kiwi, I promised we’d be back with a SUSE Studio article. Here we are. Read and enjoy.
Register:
SUSE Studio does require that you login with a user account. But even here, it makes it simple for you. It integrates into Google or Yahoo, so if you have a mail account with one of these providers, you’re good to go.
However, being able to login requires an invitation. Since SUSE Studio is currently still in beta, you will have to ask for an invitation to participate in the project. I did and received my invitation key after a day. With the key, I managed to login into Studio and begin my explorations.

Begin playing:
SUSE Studio is dead easy to work with. It uses a wizard that guides you through steps, helping you make the right choices, warning you about conflicting, duplicate or missing packages, wrong architecture and offers suggestions to improving your custom build.

Your first decision is to choose what kind of distro you wish to build. I decided to go for a Gnome desktop on openSUSE 11.1. Incidentally, the Firefox browser was open on top of a KDE4 openSUSE 11.1 desktop.
The next step is to name your custom distro – a.k.a. appliance:

Customize:
Now comes the really fun part – customization. You’re the boss. What you decide to use goes into the distro and nothing else.

Software:
The first step is to choose the software – this means repositories and packages.

Of course to make a useful appliance, you do need to know the basics of what you may need. The default choice will work, but it will be an austere, minimalistic appliance with just the basic stuff to make things boot and nothing more.
Your first step would be to add extra repositories and then choose extra programs. Luckily, browsing the software categories and adding stuff is quite easy. Missing dependencies will be automatically solved. Likewise, you’ll be informed about any package that cannot be installed, due to missing files or maybe errors in the repositories.
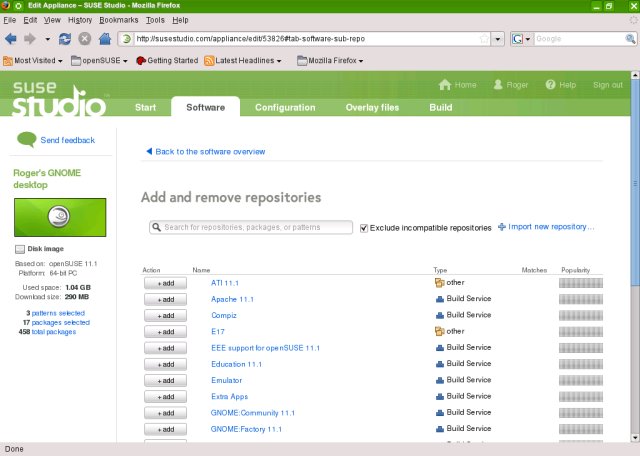

You’ll also have the Popularity column to help you decide whether a particular programs you’re trying to install is used widely by the other SUSE users. The Studio will also recommend packages for you.

One thing I did not like is that you cannot select more than 200 packages at the same time. This makes adding large numbers of programs slightly cumbersome. I hope this will be sorted out in the future versions of the Studio.

You can also work by software groups rather than packages or individual repositories. For most people, this will be an easier, simpler approach.

Errors
Like I said earlier, you’ll be informed about bad package – those that cannot be installed, for whatever reason, usually missing files at the repository server. Pay attention to the errors and warning messages, they will save you a lot of time! Plus, they will help your build work properly.

Configuration:
The next step is to configure your distro. This step has many sub-sections, including general settings, personalization, startup, and others. The first one touches the general options.

You’ll be able to choose the language, keyboard and the time zone and tweak the network and security settings.
The Personalize tab lets you change the splash screen and the wallpaper and add a SUSE logo to your appliance. You can also upload your own log or the background.

The Startup defines the default runlevel into which to boot. Most people will want the graphical login, with the full desktop.

Storage lets you define the memory size and the disk size for the appliance. If you’re building a live CD/DVD (.iso file), this is less important, but if you decide to make a virtual machine appliance, then these settings are just like creating a new virtual machine.

There are also scripts that you may want to add to your appliance, but this is mainly for advanced users. Likewise, most people need not play with the Server and Desktop tabs.
Files
You can also add your own files to the new distro, if you want:

Build:
Basically, that’s it. It’s time to build your appliance.
Choose appliance type
Your first step is to choose the output format. Like Kiwi, the Studio lets you create virtual machines, disk images or live CD/DVD. You can create either one – or all, as you see fit. Click on Build, lean back and wait.

The building process will now start. Depending on your choice, it can take some time.


Once the build is complete, simply download the appliance and test it!

Test:
And here we go, our appliance booting:


Test drive in your browser!
SUSE Studio also lets you test your appliance inside your own browser! But this requires opening a few ports in your firewall/router, so some users may not be comfortable with this. But the good thing is, you can do this in any browser, even on Windows.

Problems:
Your appliance may not boot. Making a good, fully featured appliance takes time and patience. You can’t just slap software together and make it all work magically. While the Studio is really forgiving toward users, it cannot render miracles. You will have to be careful when making your project.
Here’s an example of a failed build:

You really should not ignore the warnings, errors and suggestions displayed by the Studio. Watch the column to the left of the main work area. You’ll see lots of useful information there.

Make sure you see no yellow or red messages, as they indicate conflicting choices in your build. Likewise, pay attention to suggestions, as they will make your life easier once your new appliance is ready for use.


Conclusion:
SUSE Studio is a great invention. It’s simple and practical. Anyone can use it, be they newbs or experts, Windows or Linux users. This phenomenal project achieves so many goals at once: it offers everyone a taste of SUSE for free, plus their personal touch, which makes the desire and effort all the greater; it offers users with little programming skill the ability to tamper with operating systems and create their own, personal distros in minutes; it connects the users worldwide into a large SUSE cloud, with appliances created and built right inside the browser, regardless of the operating system underneath.
SUSE Studio has it all: it’s is an operating system, a cloud, a great and powerful tool for everyone. If you just wish to play a little with packages and bake your own CDs, go ahead, use SUSE Studio. If you want to test software or develop powerful, practical appliances, SUSE Studio is the right thing for you. You can do it anywhere, be it your home, your office or even while you wait for your next flight at the airport terminal.
I’m very pleased with the Studio. It’s Kiwi, simplified, polished and made available to the masses. A truly great step in the right direction. I’ll be looking forward to seeing this great invention flourish.
If you still have any issues then watch the videos below:

No comments: